![[eMule-Web]](images/satellite/header/logo.jpg) | |
| | #1 |
| Junior Member  Registriert seit: 01.10.2006 Ort: Titty Twister
Beiträge: 43
| Hallo, Leute!!!... Folgendes Problem: Habe hier eine XXXXX.avi-Filmdatei in Originalsprache (chinesisch!... Wie kann ich nun die avi-Datei mit der einen oder der anderen oder beiden zusammenbringen???... Gibts da ein bestimmte Proggi oder wie ist die Verfahrensweise hier?... Thx for help!!!...
__________________ Quod erat demonstrandum!...  ... ... |
| |  |
| | #2 |
| Alter Board Hase  | Du brauchst dafür (natülich) VirtualDub und dafür ein Plugin namens "VobSub". Letzterem liegt soweit ich mich errinere eine Anleitung bei wie man es benutzt. Seiten wo es das gibt verrat ich lieber nicht weil ich da schon letztens Ärger bekommen hab (illegaler Inhalt), deswegen musst du dir wohl einen Googlehupf backen.
__________________ Pinguine sind süßer als Fenster, selbst wenn diese bunt sind! |
| |  |
| | #3 |
| Junior Member  Registriert seit: 01.10.2006 Ort: Titty Twister
Beiträge: 43
| Erstmal vielen Dank!!!...  Gut, beides vorhanden!!!...
__________________ Quod erat demonstrandum!...  ... ... |
| |  |
| | #4 |
| Advanced Member  Registriert seit: 05.10.2005
Beiträge: 134
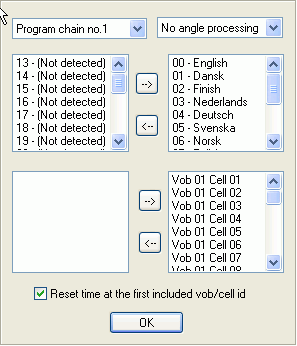
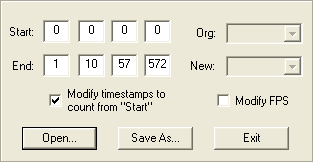
| ich hab dir mal die anleitung kopiert. aus oben genannten gründen geb ich die quelle mal nur mit "doom9" an VobSub Guide There isn't very much to say here, really. But since a lot of people apparently simply ignore the faq.txt file in the vobsub zipfile here we go: DirectVobSub is simply a DirectShow filter which can be used to display subtitle files created by VobSub during playback in Windows Media Player, PowerDivX NextGen and maybe other players as well. Since VobSub grabs the subtitle as bitmaps rather than using OCR it's possible to have all kinds of special characters without hassle and you don't have to train any program. Step 1: Installation Run the installation program to install both VobSub (required for subtitle extraction) and DVobSub (required for playback). Step 2: Rip the subtitles Start a command prompt (start - run - command/cmd), change to the directory where you have vobsub.dll and type "rundll32 vobsub.dll,Configure" Press open and specify the IFO from your movie. Then you'll be asked for a directory where it can save the index file. Don't worry, that file is less than 1MB. Then you'll be presented this screen:  By default all subtitle stream that VobSub can identify will be selected (= be on the right side). If you'd like to remove some, or add other streams you can just select them and press the --> button (to add) and <-- button (to remove) to add and remove respectively. By default all subtitle stream that VobSub can identify will be selected (= be on the right side). If you'd like to remove some, or add other streams you can just select them and press the --> button (to add) and <-- button (to remove) to add and remove respectively.By default Program chain no.1 is selected which is normally the main movie. If in doubt start DVD Decrypter, press I and look what PGC it selects (it will select the main movie), or you might recall which PGC you ripped. Do not touch the Vob and Cell section unless you really know what you're doing, make sure Reset time at the first included vob/cell id is checked, then press OK. After indexing you'll the the following screen. Select the right subtitle track in the marked dropdown list. You can also define the colors for your subtitles and the transparency and move the subs if you don't like them at their current place.  Then press OK. After a while when it's done indexing press OK to get back to the filter selection. VobSub will have created 3 new files in the directory you indicated before (to save the index file). These files are named like your ifo file, for instance in our case vts_01_0.ifo, vts_01_0.idx and vts_01_0.sub. Rename these 3 files so that they have the same name as your AVI file. For instance if your AVI is called matrix.avi rename vts_01_0.ifo to matrix.ifo, vts_01_0.idx to matrix.idx and vts_01_0.sub to matrix.sub. You can also compress the .sub file using WinRar. Step 3: Cutting First you have to cut your AVI files. To do this you most likely are going to use VirtualDub. VirtualDub shows the current time point in its timeline. Write down that value exactly as it is.  Start up a command prompt again, go to the directory where vobsub.dll is and type "rundll32 vobsub.dll,Cutter".  Press Open... and select your subtitle files. Then enter the exact start and end values as VirtualDub gave you. The first AVI starts at 0:0:0:0. The 2nd starts with the end time of the first, etc. Press Open... and select your subtitle files. Then enter the exact start and end values as VirtualDub gave you. The first AVI starts at 0:0:0:0. The 2nd starts with the end time of the first, etc.Each time you've set it up for a disc press Save as and give it the same name as the AVI for the current CD has. Step 4: Playback Put your AVI, IFO, IDX and SUB file into the same directory and double click on the AVI. Right clicking in the window will bring up a popup menu where there's an entry called languages. There you'll find the various languages and you can turn subtitles on or off. |
| |  |
| | #5 |
| Alter Board Hase  | Jepp, das ist genau die Anleitung von der ich fälschlich dachte sie wäre bei VobSub dabei.
__________________ Pinguine sind süßer als Fenster, selbst wenn diese bunt sind! |
| |  |
| | #6 |
| Junior Member  Registriert seit: 01.10.2006 Ort: Titty Twister
Beiträge: 43
| Nach langem Experimentieren endlich am Ziel!!!... Danke vielmals!!!... 
__________________ Quod erat demonstrandum!...  ... ... |
| |  |
 |
| Lesezeichen |
| |
Ähnliche Themen: Avi-Datei mit Untertiteln versehen...
- Probleme mit den Untertiteln. Wer kann helfen?
Filesharing - 25. August 2012 (2) - Mkv Format/Vlc Media Dateien mit Bildern zur Vorschau versehen ?
Filesharing - 7. August 2012 (2) - wie kann man eine 1080p mkv datei in eine 1080p avi datei konvertieren?
Filesharing - 31. October 2011 (2) - mkv in avi umwandeln mit mehreren Tonspuren / Avi läuft nicht auf DVD-Player
DivX / XviD / *VCD - 7. April 2011 (6) - Probleme mit Avi Datei(en)
DivX / XviD / *VCD - 13. October 2009 (7) - Matroska container mit XviD.1.03 und AAC.5.1 mitsamt untertiteln wieder nach DVD...
Video Off-Topic - 10. August 2008 (9) - Cover zu AVI Datei hinzufügen
DivX / XviD / *VCD - 17. December 2006 (2) - Beim Umcodieren einer avi mit Nero wird die Datei sehr groß
Video- und Brenn-Tools - 16. December 2006 (6) - avi dvd mit menu versehen / standalone Player
DivX / XviD / *VCD - 20. July 2004 (4) - Bei avi-Datei fehlen noch 3,3%, ist die Datei zu retten?
eMule Allgemein - 23. April 2004 (10) - wie kann ich ein file mit einem schreibschutz versehen???
Mülltonne - 21. October 2003 (2) - AVI Datei
Video- und Brenn-Tools - 29. March 2003 (25)
Alle Zeitangaben in WEZ +1. Es ist jetzt 05:52 Uhr.


